A breaker block forms when a previously significant price level loses its original role and begins to act as a support or resistance zone in the opposite direction. This occurs in scenarios where price breaks out of an already existing support/resistance level and tests it from the opposite direction.
Instead of assuming that this price level should automatically be used as an opportunity to enter into the market, one should look at the process of how such levels are formed.
In this blog you will find everything related to the breaker block including its formation, different types and a proper trading setups.
Breaker Block Formation: How Does It Develop?
A breaker block does not appear from a single candle. It develops through a series of price movements that show a previous zone has lost its original function.
Here you will find a step by step guide to develop the breaker blog:
Step 1: Identify an Important Price Zone
Begin by identifying a relevant support, resistance, or order block level which has impacted the price movement. Do not flag each consolidation as a probable breaker.
Step 2: Watch for the Zone to Fail
Price should make its way through the initial zone rather than honoring it. A significant breakout would usually have more weight than just a wick or penetration.
Step 3: Confirm a Structural Shift
Following the breakout, see if there is any change in the short-term structure of price. This could be evidenced by a clear movement above or below a swing level.
Step 4: Wait for the Retest
The price can go back to the damaged area following the first move. The retest is very crucial since it gives traders an opportunity to see whether the level is starting to function in its new capacity.
Step 5: Evaluate the Price Reaction
Search for validation through the trade strategy. Rejection, continuation, or any other specific signal could aid in deciding the validity of the set-up.
Types of Breaker Blocks
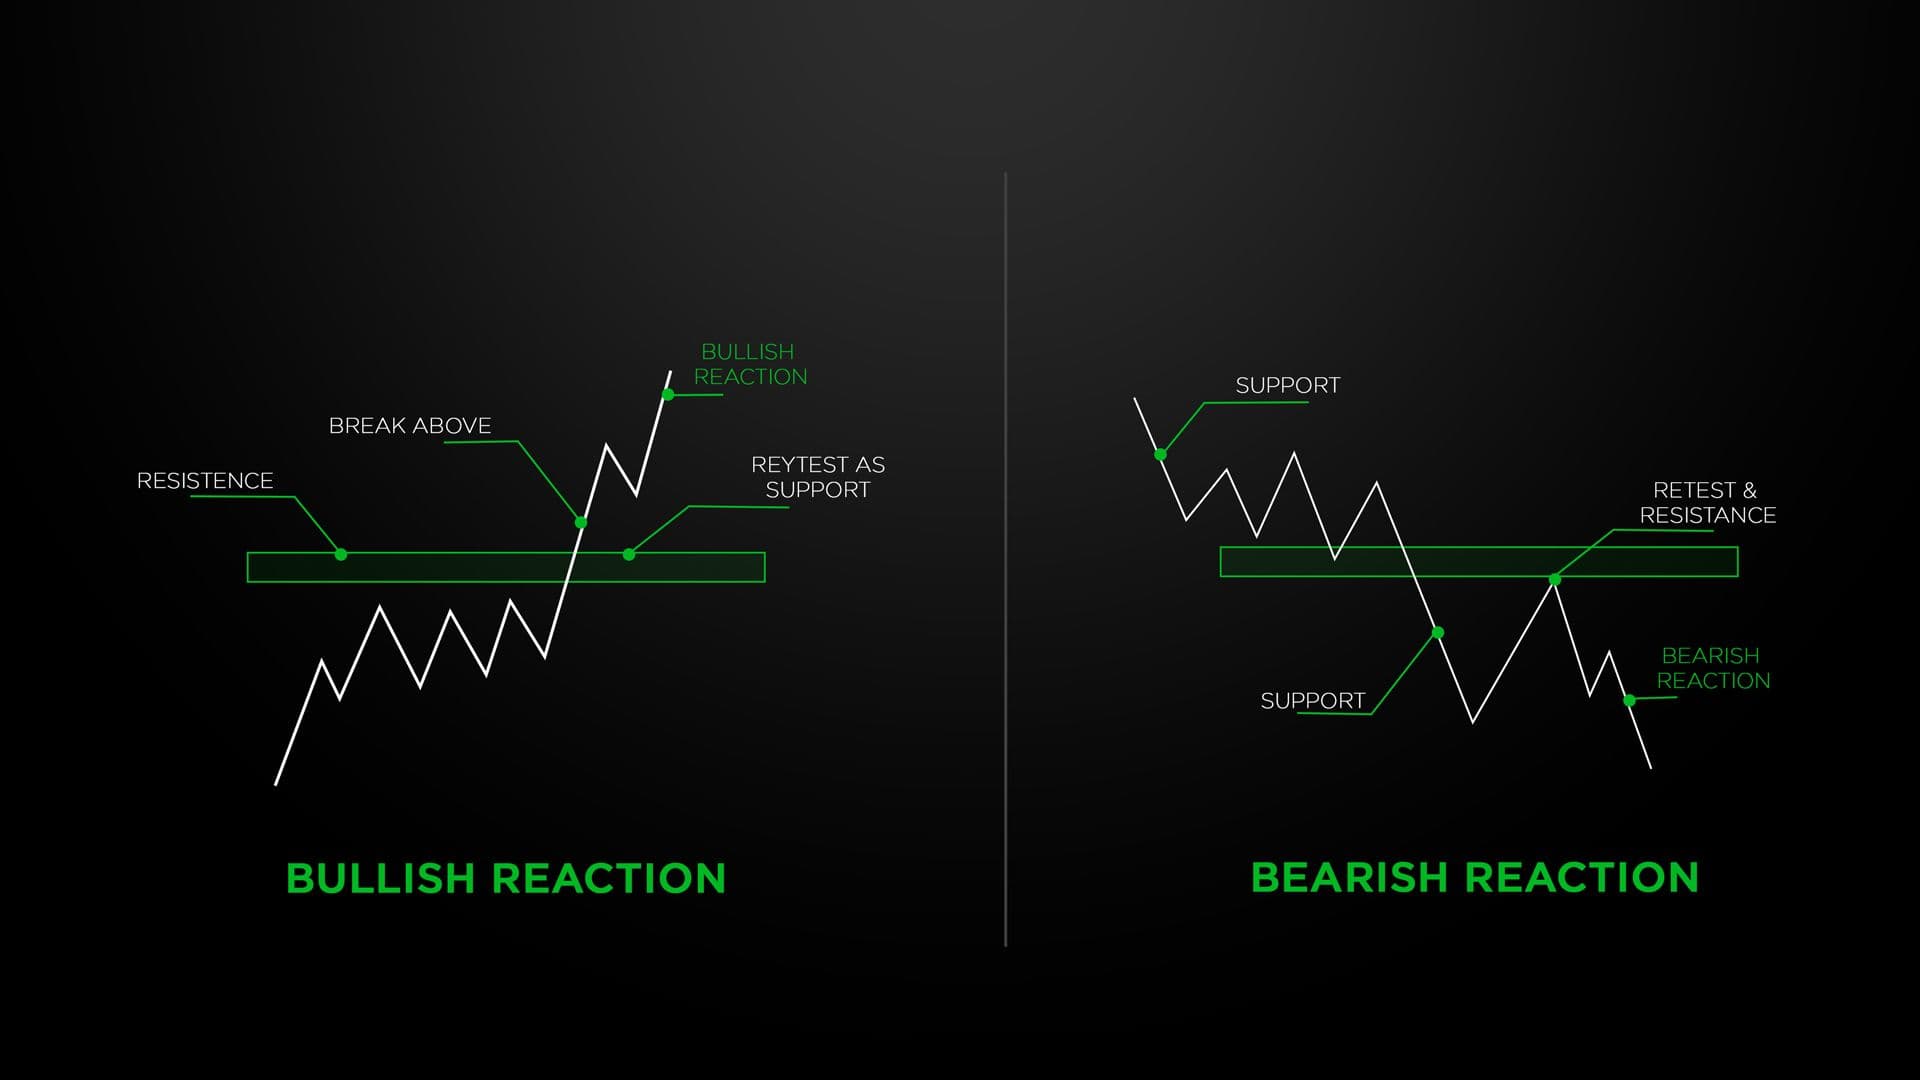
Breakout blocks can be generally classified as bullish or bearish setups, depending on whether there is an upward or downward breakout from the structural area and the subsequent role of that zone.
Below you will find more details regarding the types of breaker blocks:
Bullish Breaker Block
It is possible that a bullish breakout structure forms when price moves above a resistance level and tests it again as a support level later on.
Methods for identifying it:
- Find a suitable resistance level.
- Wait for the bulls to move above this level.
- Ensure that a bullish change in structure occurs.
- Let price move back toward the broken level.
- Form a bullish reaction while testing this level.
- This set-up is more significant when there is good displacement that backs the breakout, rather than poor or overlapping price action.
Bearish Breaker Block
Bearish Breaker Block formation may occur in case price breaks down from a support level before testing it again as a possible resistance level.
Identification steps for Bearish Breaker Block:
- Find a significant support level.
- Wait until sellers break below it.
- Confirm the change in structure that is bearish.
- Check if there is a retracement to the old support level.
- Check for bearish confirmation or selling pressure.
However, if price quickly recovers the zone, staying above it, the bearish scenario loses validity.
Breaker Block Trading Setup: How to Plan a Trade
A breaker block trading strategy should include clear conditions for entry, invalidation, and profit objectives. The zone itself should be treated as an area of interest rather than an automatic signal.
Here you will find a step by step guide to plan a trade using breaker block trading setup:
Step 1: Define the Market Context
Look at the overall structure first and then the setup. Spot the prevailing trend, the pivot points, and other neighboring regions that can affect prices.
Step 2: Mark the Breaker Zone
Once it is verified that the original area has failed, highlight the area that will be important during the retest.
Step 3: Wait for Price to Return
Don’t pursue the break above the range. Let price move back into the range if the trade needs retesting.
Step 4: Confirm the Entry
Apply a preset confirmation approach including rejection, continuation pattern, and lower timeframe structure shift.
Step 5: Set Invalidation and Target
Determine where the setup would be considered wrong and identify a logical profit target before entering.
Step 6: Control the Risk
Position size should reflect the amount of capital being risked. A valid-looking setup can still fail, so risk should remain controlled.
Breaker Block vs. Order Block
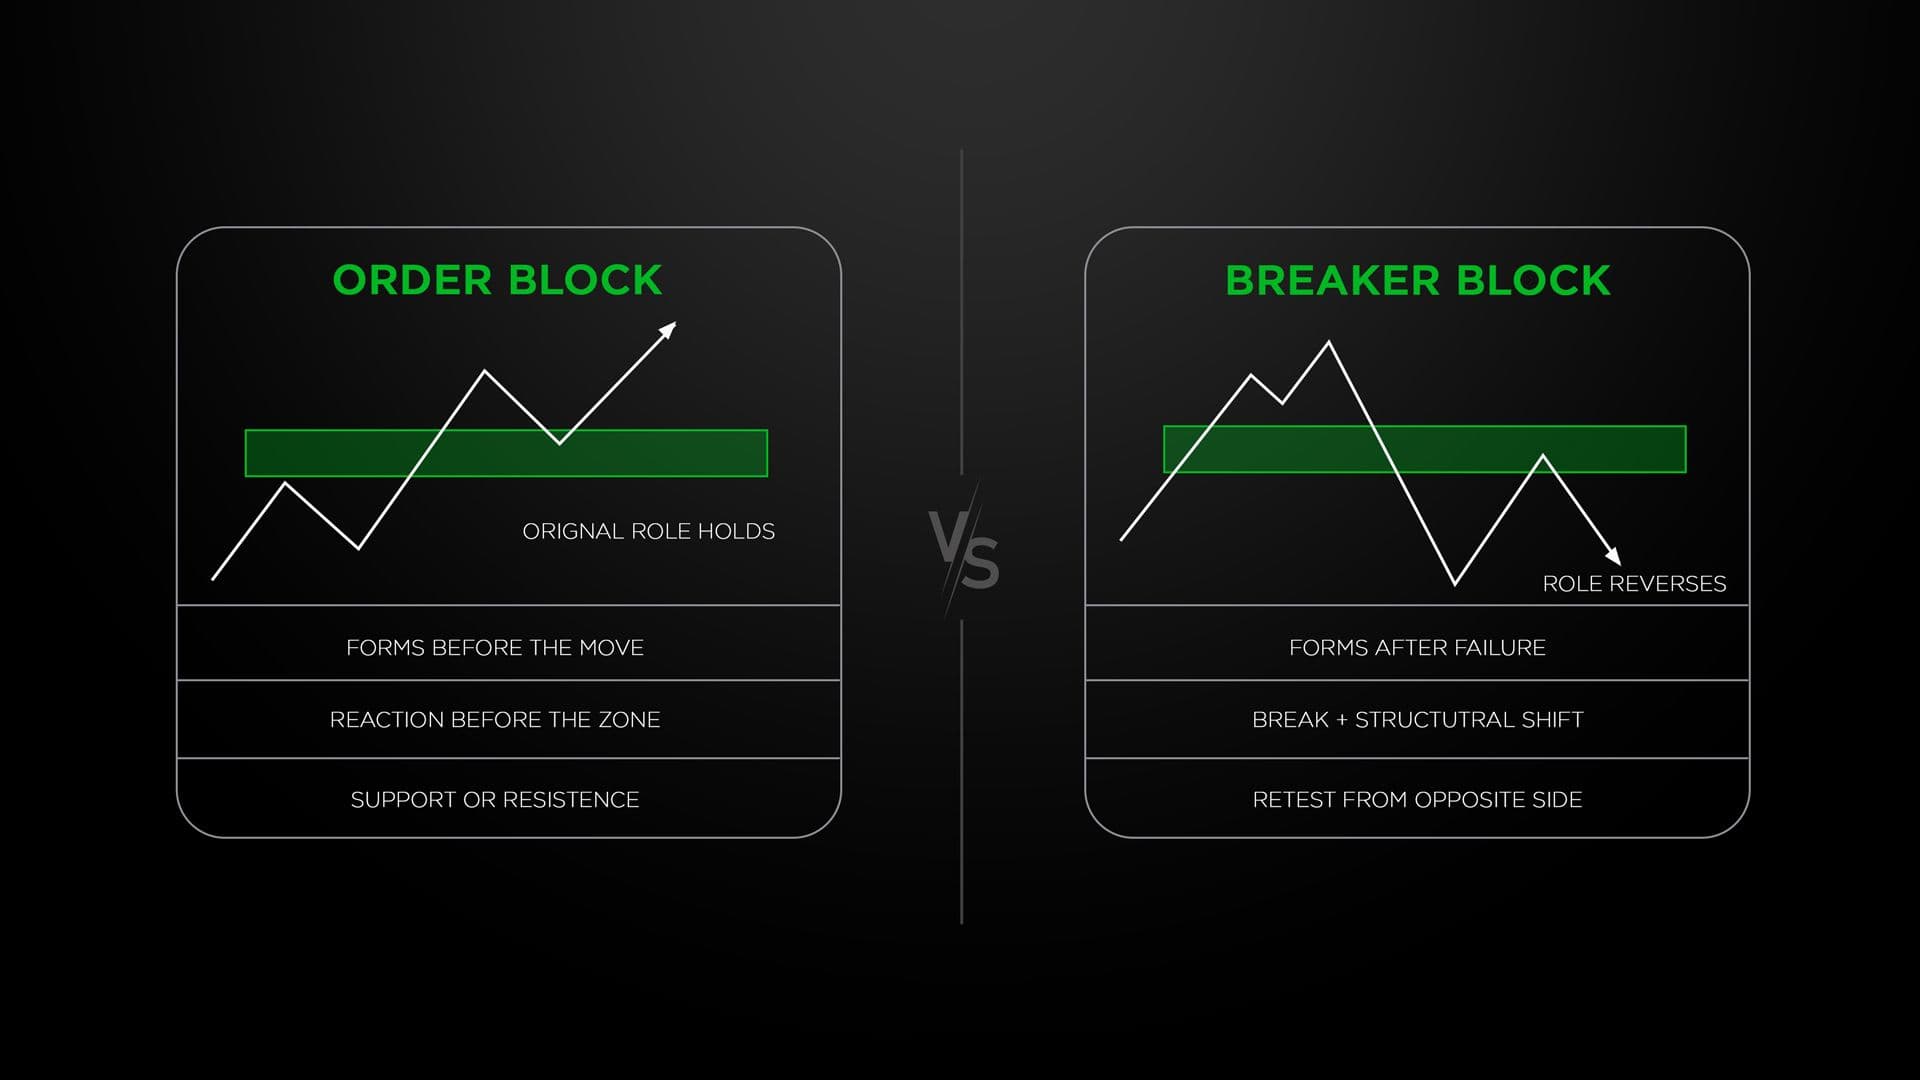
Breaker block and order block have a strong relation to each other; however, they play different roles in price action analysis. The knowledge of the difference will enable traders to determine whether the zone continues working as usual after a structural break or not.
Below you fill find a proper comparison table to understand both terms better:
| Feature | Order Block | Breaker Block |
|---|---|---|
| Definition | A price zone associated with a significant move or institutional order flow. | A previously respected zone that has failed and may take on the opposite role. |
| Formation | Forms before or around a strong directional move. | Forms after the original zone is broken and invalidated. |
| Market Role | May act as potential support or resistance. | May switch from support to resistance or vice versa. |
| Key Requirement | A meaningful price reaction from the zone. | A clear failure of the original zone followed by a structural shift. |
| Price Behavior | Price may react in the same direction as the original zone. | Price may react in the opposite direction after a retest. |
| Main Focus | Identifying a potential area of buying or selling interest. | Identifying a potential role reversal after a failed zone. |
| Retest | Price may return to the zone to seek continuation or reaction. | A retest helps determine whether the broken zone has changed its function. |
| Trading Context | Often analyzed with market structure, liquidity, and trend direction. | Often analyzed with structural breaks, displacement, liquidity, and confirmation. |
| Key Idea | The zone holds its original function. | The zone fails and potentially changes function. |
Common Mistakes When Using Breaker Blocks
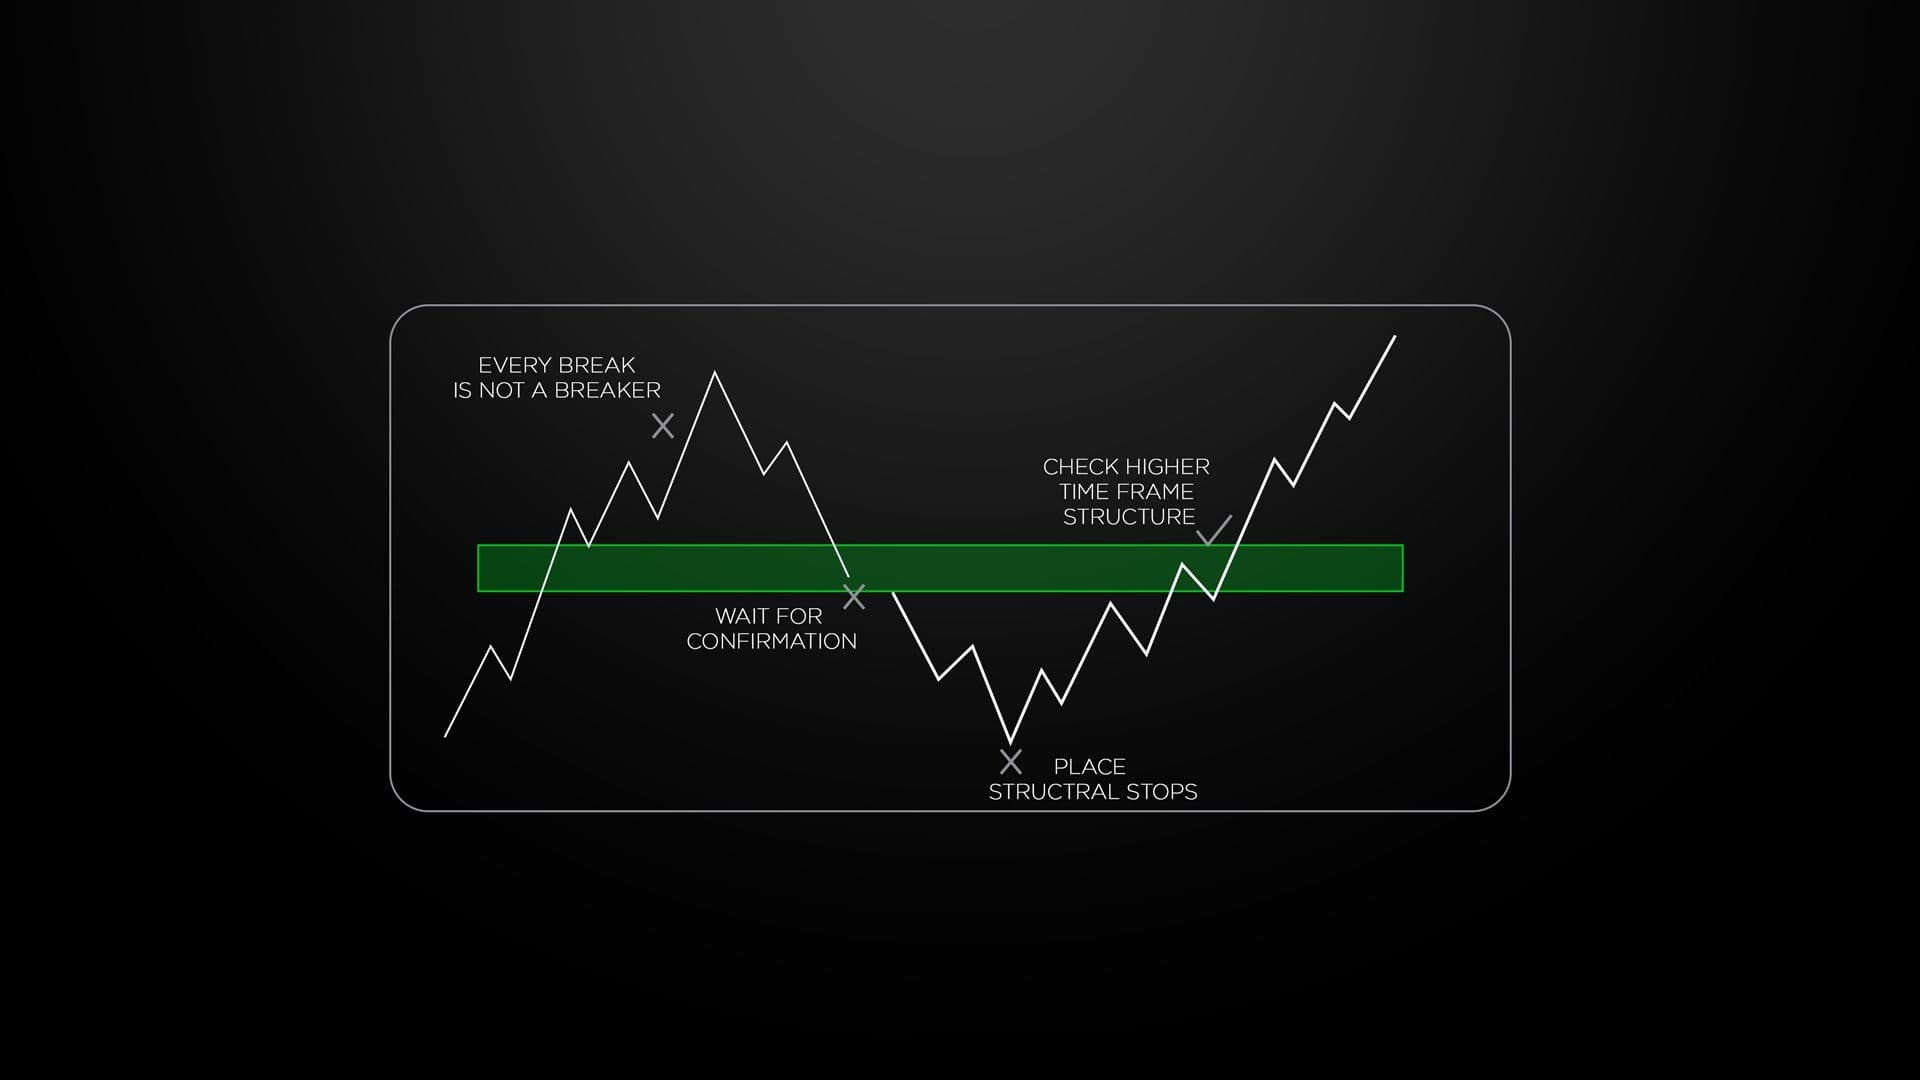
Even a well-formed setup can become unreliable when applied mechanically.
- Treating every broken zone as a breaker
- Entering immediately without confirmation
- Ignoring the larger market structure
- Marking too many zones
- Placing stops at arbitrary levels
- Assuming a retest must produce a reversal
The strongest analysis comes from evaluating the entire price sequence rather than focusing on the zone alone.
Conclusion
A breaker block formation occurs as part of a specific process, namely, an essential zone is breached, changes in the market structure take place, and finally price retests that area. This kind of formation will enable traders to see opportunities for role reversal without regarding every broken zone as a signal to trade.
Two versions of this formation exist, bullish and bearish. A good trading approach will help to define the criteria for confirmation, invalidation, target, and risk.
Frequently Asked Questions
What is a breaker block?
Breaker Block refers to a price level that has lost its effectiveness in its initial purpose and can subsequently act as the opposing zone.
How does a breaker block form?
It is formed in situations where a significant price level is broken, followed by a shift in market structure, after which price moves back to the previous level.
What is a bullish breaker block?
This is normally a former resistance level which breaks out and will later turn to be a support level at retest.
What is a bearish breaker block?
It is typically a former support level which breaks down and will later become a resistance level when prices go back.
Can a breaker block fail?
Yes. Prices may move within the level rather than respect their new roles. This is why confirmation and pre-defined risk management is essential.